| Main | Gameplay | Story | Characters | Music | Miscellaneous |
|---|
Gameplay[]
Controls[]
The game may be played using either a keyboard or a gamepad.
Keyboard controls are as follows:
- The Arrow Keys move the character around
- Z causes a short barrage of shots to be fired; it may be held down for rapidfire
- X releases a bomb, also known as a Spell Card (presuming that any are left)
- Shift slows the character's movement, and changes the nature of the character's shot and bomb; it generally makes your attacks more focused
- Esc pauses the game and brings you to the in-game menu
- Ctrl fast-forwards through any dialogue
- Home produces a .bmp screenshot in the /snapshot directory.
Basic Gameplay[]
Perfect Cherry Blossom plays like a fairly typical vertically-scrolling danmaku shooting game, in which the player's character is always facing towards the top of the screen, shooting at anything that moves, avoiding and weaving between enemy bullets, and confronting difficult bosses at the end of a stage.
There are 4 levels of difficulty: Easy, Normal, Hard, and Lunatic. Each difficulty level features differences in the number of bullets fired by each enemy, rate of fire, variations in the bullets' pattern of movement, and the number and type of enemy Spell Cards used.
The player will traverse 6 increasingly harrowing stages through the course of a regular game. The trial version ends prematurely at Stage 3.
Once the game has been completed without continuing, an Extra Stage is unlocked, available for any character that has accomplished that feat. The Extra Stage features significantly stronger and faster enemies, an extremely difficult midboss and boss battle, and no option to continue if all lives are lost.
The Phantasm difficulty of the Extra Stage is unlocked for a character once you clear the Extra Stage and capture 60 spellcards with all characters combined. This one is like a "second quest" of Extra. Many of the Spell Cards are similar, but all of them are ramped up in difficulty.
Shot[]
A character's "shot" is the player's primary method of attacking enemies. While the shot's attack area and behaviour varies depending on the character type the player has chosen, the shot can be powered up by filling up the Power Level by collecting power items. The shot gradually becomes more powerful when the player reaches the Power Levels of 8, 16, 32, 48, 64, 80, 96, and 128 (MAX), respectively. When the player reaches MAX power, all bullets on the screen cancel out and become star items which are automatically collected. While the player has maximum shot power, the player may auto-collect all items on screen by moving their character close to the top of the screen. This ability is very important for achieving high scores.
Bomb[]
A character's "bomb" is the player's limited-use method of getting out of difficult situations. A bomb's attack area, duration, and power varies depending on the character type the player has chosen, but it typically deals heavy damage to every enemy it touches, in addition to cancelling out any bullets in the bomb's way, as well as automatically collecting every item on screen. The player's character becomes invincible during and for a short time after the bomb's effect wears off. At the beginning of the game and any time your character respawns, you will start off with X bombs, where X is determined by your character. Bomb items will increase your current stock by one. You can carry up to a maximum of 8 bombs at a time. If you receive a bomb when you already have the maximum, that bomb will be lost.
Lives[]
With default settings, you will start off with 3 lives. You can lose a life by getting "hit" by an enemy attack.
The hit box for your character is quite small in comparison to your on-screen sprite, approximately only 5 pixels by 5 pixels in size. If you hold Shift, a white dot will appear, showing the hitbox precisely. If the hit box of your character's sprite comes into contact with the hit box of an enemy bullet, laser, or the enemy itself, then you have been hit.
If you have bombs in stock and the Bomb key is pressed within a short time of the player's character being hit, then the hit can be negated and countered with a bomb. This counter-bomb time interval only lasts about 0.1-0.3 seconds, depending on your character, after which you will lose a life as normal. A Supernatural Border being activated within this interval has the same effect, negating the hit and immediately canceling the border.
The player is awarded extra lives upon reaching certain point item totals or by collecting 1up items. For the regular game, extra lives are awarded at 50, 125, 200, 300, 450 and 800 point items and every 200 items after that. For the Extra Stage, extra lives are awarded at 200, 500, 800 and 1,300 point items. You can carry up to a maximum of 8 extra lives at a time. If you receive an extra life when you already have the maximum, you will receive a bomb instead.
Upon losing all their lives, the player is given the choice to continue right where they left off. However, if you do continue, your current score will be reset back to 0 + the number of times you have continued, you will not be able to save a replay of your game, and you will reach the "Bad Ending" if you finish the game. You may continue up to 5 times.
Boss Battles[]
The main challenge and the main attraction. Each boss has multiple lives, which are represented by multiple health bars shown at the upper left of the screen. Bosses usually alternate between attacking normally and attacking with Spell Cards, switching once with each health bar. Coloured sections on the health bar indicate the start of a Spell Card attack when the boss' health is depleted that far.
Normal attacks are incrementally stronger versions of the boss character's basic attack. Spell Card attacks bedazzle the player with combinations of complex patterns that often involve the use of projectiles and obstacles crafted especially for use with that Spell Card. If the player manages to defeat a Spell Card attack without getting hit or using any bombs, a substantial score bonus is rewarded for the feat.
Each attack is accompanied by a timer. When time runs out, the boss will switch to their next attack pattern even if their health bar isn't empty. Waiting for a boss character's attack pattern to self-destruct may be enough to beat them, but mere survival won't earn the player any score bonuses.
When fighting a boss, a position marker shows up on the bottom margin of the screen, indicating where the boss is on the horizontal axis. Since your target can be completely obscured by bullets at times, use this marker to help you aim your shots.
Character Statistics[]
There are three characters to choose from, each of which have two styles of attack. The player decides which character to play and which attack type to use at the start of the game.
楽園の素敵な巫女 (Wonderful Shrine Maiden of Paradise)
Reimu Hakurei
- Basic Performance
- Normal Speed: Medium
- Focused Speed: Slow
- Initial Bombs: 3
- Cherry penalty for dying: 100,000 or 50% of Cherry, whichever is smaller
- Special Characteristics
- Small hitbox.
- Extra time to use a bomb after getting hit, but before dying.
- Reimu Type A
- 霊符 追尾タイプ (Spirit Sign, Pursuit Type)
- At Normal Speed:
- Shot: 「ホーミングアミュレット」 ("Homing Amulet")
- Bomb: 「夢想封印 散」 ("Fantasy Seal -Spread-")
- At Focused Speed:
- Shot: 「博麗アミュレット」 ("Hakurei Amulet")
- Bomb: 「夢想封印 集」 ("Fantasy Seal -Concentrate-")
- Rate of Cherry increase per shot: Low
- Cherry penalty for bombing: 19.95% unfocused, 21.75% focused
- Reimu Type B
- 夢符 速射タイプ (Dream Sign, Rapid-Fire Type)
- At Normal Speed:
- Shot: 「パスウェイジョンニードル」 ("Persuasion Needle")
- Bomb: 「封魔陣」 ("Evil Sealing Circle")
- At Focused Speed:
- Shot: 「エクスターミネーション」 ("Extermination")
- Bomb: 「二重結界」 ("Duplex Barrier")
- Rate of Cherry increase per shot: High
- Cherry penalty for bombing: 16.8% unfocused, 16.625% focused
普通の黒魔術少女 (Ordinary Black-Magic Girl)
Marisa Kirisame
- Basic Performance
- Normal Speed: Fast
- Focused Speed: Medium
- Initial Bombs: 2
- Cherry penalty for dying: 100,000 or 50% of Cherry, whichever is smaller
- Special Characteristics
- The point-of-collection boundary is low.
- The height where items have their maximum value is low (a bit lower than the point of collection itself).
- Marisa Type A
- 魔符 威力重視タイプ (Magic Sign, Power-Oriented Type)
- At Normal Speed:
- Shot: 「マジックミサイル」 ("Magic Missile")
- Bomb: 「スターダストレヴァリエ」 ("Stardust Reverie")
- At Focused Speed:
- Shot: 「マジックナパーム」 ("Magic Napalm")
- Bomb: 「ミルキーウェイ」 ("Milky Way")
- Rate of Cherry increase per shot: Very high
- Cherry penalty for bombing: 30.0% unfocused, 32.5% focused
- Marisa Type B
- 恋符 貫通タイプ (Love Sign, Penetration Type)
- At Normal Speed:
- Shot: 「ストリームレーザー」 ("Stream Laser")
- Bomb: 「ノンディレクショナルレーザー」 ("Non-Directional Laser")
- At Focused Speed:
- Shot: 「イリュージョンレーザー」 ("Illusion Laser")
- Bomb: 「マスタースパーク」 ("Master Spark")
- Rate of Cherry increase per shot: Fairly high
- Cherry penalty for bombing: 34.5% unfocused, 40.8% focused
完全で瀟洒な従者 (Perfect and Elegant Maid)
Sakuya Izayoi
- Basic Performance
- Normal Speed: Medium
- Focused Speed: Fast (relative to the other characters)
- Initial Bombs: 4
- Cherry penalty for dying: 60,000 or 33% of Cherry, whichever is smaller
- Special Characteristics
- Large graze-box.
- The amount of cherry points lost when hit is less.
- Sakuya Type A
- 幻符 攻撃範囲重視タイプ (Illusion Sign, Attack-Range-Oriented Type)
- At Normal Speed:
- Shot: 「ジャック・ザ・ルドビレ」 ("Jack the Ludo Bile")
- (Ludo bile (лудо биле) is a Bulgarian slang for belladonna (Беладона). Ludo bile means "mad herb".)
- Bomb: 「インディスクリミネイト」 ("Indiscriminate")
- Shot: 「ジャック・ザ・ルドビレ」 ("Jack the Ludo Bile")
- At Focused Speed:
- Shot: 「ジャック・ザ・リッパー」 ("Jack the Ripper")
- Bomb: 「殺人ドール」 ("Killer Doll")
- Rate of Cherry increase per shot: Very low
- Cherry penalty for bombing: 28.0% unfocused, 28.75% focused
- Sakuya Type B
- 時符 特殊タイプ (Time Sign, Tricky Type)
- At Normal Speed:
- Shot: 「ミスディレクション」 ("Misdirection")
- Bomb: 「パーフェクトスクウェア」 ("Perfect Square")
- At Focused Speed:
- Shot: 「パワーディレクション」 ("Power Direction")
- Bomb: 「プライベートスクウェア」 ("Private Square")
- Rate of Cherry increase per shot: Fairly high
- Cherry penalty for bombing: 25.6% unfocused, 28.5% focused
Screen Layout[]
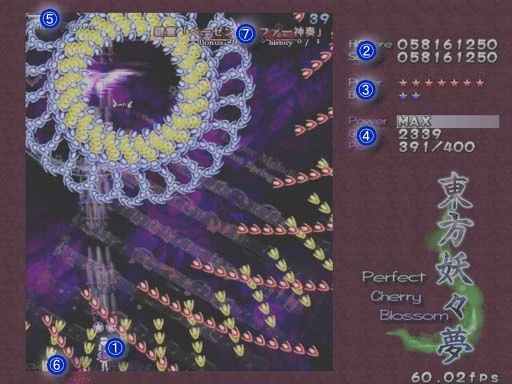
- Your character
- Player Score
- High Score: your highest score for the current character, type, and difficulty
- Score: your current score
- The number of remaining lives and bombs / The approximate location of the point of collection
- Player Status
- Power: your shot power level, maxing out at 128
- Graze: the number of enemy shots that have grazed your hitbox during the game
- Point: the number of point items you have collected during the game, and the amount needed for an extra life
- Enemy Status
- Left bars: the number of health bars the enemy has left in reserve
- Right number: the amount of time left before the enemy's attack spell self-destructs
- Middle bar: the current health bar of the enemy
- Cherry Status
- Cherry: your current Cherry level, maxing out at CherryMax
- CherryMax: your current CherryMax level
- Cherry+: your current Cherry+ level, activating Supernatural Border at 50000
- Spell Card Status
- Title: the name of the Spell Card being used
- Bonus: the constantly-updating value of the Spell Card Bonus
- History: the number of times you have "collected" the Spell Card currently being used, and the number of times you have faced it.
Scoring[]
The scoring system is heavily tied to your Cherry level, somewhat similar to Mystic Square. Listed below are the details for how points are given in Perfect Cherry Blossom.
Enemies[]
Any damage you deal to any enemy, whether it be caused by your shots or your bombs, will cause your score, Cherry, and Cherry+ to increase very slightly. Actually destroying enemies will award you slightly more points, but the points earned from this are around the range of hundreds to thousands of points per enemy. This is not a significant amount at all. However, enemies shoot bullets for you to "graze" and release items for you to collect, and those are very important for scoring as covered below.
Grazing[]
"Grazing a bullet" means to have a bullet or laser come dangerously close to your hitbox. Each graze will add 2000 to your score, and will increase your "Graze number" by 1, which is used to calculate the Clear bonus. You can only graze a bullet once, so you won't gain any additional points or graze by following a bullet. Lasers can be continually grazed throughout their duration, but once again, moving around will not gain you any additional points or graze.
Grazing also increases your Spell Card bonus, if you happen to be facing one at the time.
Point Items[]
As its name implies, point items are the major source of points in the game. The higher up on the screen you collect them, the more points they are worth, up to a defined maximum. You can easily tell when you are collecting point items for their maximum value, since they show the value in yellow text. The auto-item-collect line is the same height as the height where point items reach their maximum value, so take advantage of this fact wherever you can for massive points. The maximum value for point items are based on your Cherry level, or 50000, whichever is greater.
An important thing to keep in mind is that point items collected below the maximum value threshold are worth less their maximum value. At merely a pixel below the line,the value drops drastically, from 99% at very low Cherry to 25-30% when you have a high Cherry level. This is a very large difference, so do your best to collect items without prematurely retreating down to the lower parts of the screen. Also, point items collected at the bottom of the screen are worth around 10% of their maximum value. The number of point items collected per stage is used to calculate the Clear bonus, to be discussed later.
Power Items[]
While your shot is not fully powered up, power items are worth only 10 points. Once fully powered up, all power items currently on the screen become cherry items. While the character is at max power, power items no longer appear, and cherry items appear instead.
Large power items are worth 8 power items. There is also a full power item, which appears if you continue. It brings you to full power, and is worth 1000 points if you are already at full power.
Cherry Items[]
Cherry items increase both Cherry and Cherry+ by 1000 + (100 * the number of Spell Cards successfully collected). If the player is not at CherryMax, they are worth zero points. Otherwise they are worth 50000 above the point of collection, and decrease in value in a linear fashion as they descend. You can easily tell when you are collecting cherry items for their maximum value, since they show the value in yellow text. Their point value is separate from their cherry value.
On the bosses of stages 6, Extra, and Phantasm, defeating an attack phase or spell causes the bullets to turn into Cherry items instead of Star items. These are worth 100 Cherry/Cherry+, and the same number of points as a star item would be.
Mini Cherry items look like small cherry blossoms instead of squares. They increase Cherry/Cherry+ by 30 points.
Star Items[]
These items appear any time an enemy bullet is cancelled out. This can happen when you defeat an attack pattern of a boss (by depleting their current healthbar), at the moment you gain maximum shot power, when you destroy a certain enemy, or when you erase enemy bullets with a bomb. Each star item is worth 300 points + 10 points for every 40 grazes you have by that point. So for example, if you currently have 304 graze and you collect a star item, it will be worth 300 + (10 * (304 / 40)) = 370 points. The only exception is when star items are created by a bomb, in which case each star item generated is worth exactly 100 points. Star items are also worth 20 Cherry and Cherry+ each normally, and 5 when created with a bomb.
Enemy Bullet Bonus[]
When you finish off one of the boss's lives (caused by completely depleting the visible healthbar) or defeat a Spell Card of a boss, all enemy bullets on screen are tallied up to calculate the Enemy Bullet Bonus. The more enemy bullets there are on screen, the higher this bonus becomes. This bonus is independent of any star items collected from finishing off a boss's attack pattern. Finding the correct time in a boss's attack to finish them off can mean the difference between an Enemy Bullet bonus of 100,000 and one of 4,000,000 or more.
Spell Card Bonus[]
Occasionally, a boss will attack using a Spell Card. You will know this is happening when the background changes and the Spell Card's name appears in the upper right corner of the screen. If the boss's healthbar is depleted within the time limit and without getting hit or using a bomb, the Spell Card bonus will be added to your score. The starting value of the bonus depends on the Spell Card used, and ranges from 2,000,000 to 8,000,000. As the time remaining decreases, the bonus decreases in value as well, at a constant rate of (initial value) / (time limit in seconds + 10) per second. However, it increases by (Cherry/1500) * 20 + 2500 for every graze you do. This value can go up to more than 30,000,000 on a few Spell Cards. Note that prematurely cancelling a Border (by pressing the bomb button or getting hit) will forfeit the bonus.
Clear Bonus[]
At the end of each stage, the player is awarded a point bonus based on their performance throughout the stage. The bonus is calculated as follows:
Stage     x 1000000 (stage number, Extra = 7)
Point     x   50000 (point items collected in the stage)
Graze     x     500 (graze count for that stage)
CherryMax x      10 (current CherryMax value)
In addition, if the stage happened to be the last stage, the following is added:
Player x 20,000,000 (lives in stock, not including your current one)
Bomb   x  4,000,000 (bombs in stock)
Finally, depending on the conditions you played under, the result is multiplied by these modifiers, rounded down to the nearest 10:
4 Initial Lives:    x 0.5
5 Initial Lives:    x 0.2
Easy Difficulty:    x 0.5
Normal Difficulty:  x 1.0
Hard Difficulty:    x 1.2
Lunatic Difficulty: x 1.5
Extra Difficulty:   x 2.0
The end result is then added on to your score.
Cherry System[]
The heart of the scoring system. The Cherry system is based on 3 values: Cherry, CherryMax, and Cherry+. They fluctuate based on your performance.
The Cherry value is the primary number. Every point item you collect above the point of collection gives you a number of points equal to your current Cherry value. It goes up when you shoot things (at a rate based on your character). This rate is cut drastically, about 90%, if you are focused. It also goes up when you collect cherry items and when you collect star items. It goes down if you die, if you use a bomb, or if you fail to defeat a boss within the time limit. The penalty for dying or bombing depends on your character. The penalty for bombing is also scaled by the current difficulty level. The penalty is reduced by 50% on Hard, and by 75% on Lunatic. Your Cherry value can never increase beyond your CherryMax value.
The Cherry+ meter is the method for increasing your CherryMax. It goes up at the same times your Cherry goes up. When it hits 50000, you go into Border mode. During border mode, all items are automatically collected, and give their full value no matter where on the screen you are. Also, every graze will increase your CherryMax: 30 points for grazing while focused and 80 points for grazing while unfocused. It runs for 9 seconds (540 frames). You can view how much you have left using the Cherry+ meter, which counts down. Also, a sigil around your character appears and gradually shrinks during the border. It can be stopped prematurely by getting hit or using a bomb. However, you do not lose a life or spend an actual bomb for stopping it this way. If Border mode is ended prematurely in this way, all bullets on the screen will turn into mini cherry items and be automatically collected. Once your border ends:
- If time ran out, you gain 10000 points to your CherryMax value, and a point bonus equal to your current Cherry * 10.
- If you used a bomb or got hit, all bullets on the screen turn into mini Cherry items which are collected by your character. You do not get any other bonus.
Your Cherry+ meter then resets to 0. You are also invincible for a brief moment after the Border wears off.
All increases in CherryMax bring a corresponding increase to your Cherry.
| ||||||||||||||||||||||||||||||||||||||
- Return to Perfect Cherry Blossom