| Main | Gameplay | Story | Characters | Music | Miscellaneous |
|---|
Gameplay
Controls
The game may be played using either a keyboard or a gamepad.
Keyboard controls are as follows:
- The Arrow Keys move the character around
- Z causes a short barrage of shots to be fired; it may be held down for rapidfire
- X releases a bomb, also known as a Spell Card (presuming that any are left)
- Shift slows the character's movement, and changes the nature of the character's shot and bomb; it generally makes your attacks more focused
- Esc pauses the game and brings you to the in-game menu
- Ctrl fast-forwards through any dialogue
- Home or P produces a .bmp screenshot in the /snapshot directory.
Basic Gameplay
Imperishable Night plays like a fairly typical vertically-scrolling danmaku shooting game, in which the player's character is always facing towards the top of the screen, shooting at anything that moves, avoiding and weaving between enemy bullets, and confronting difficult bosses at the end of a stage.
There are 4 levels of difficulty: Easy, Normal, Hard, and Lunatic. Each difficulty level features differences in the number of bullets fired by each enemy, rate of fire, variations in the bullets' pattern of movement, and the number and type of enemy Spell Cards used.
In this system, the game starts at 11:00 pm, and 1:00 is added after each stage. If enough time orbs are collected in the stage, 0:30 is added for that stage instead. 0:30 is also added in the case the player decides to continue. If the time reaches 5:00 am before the end of the last stage, the player receives a Game Over.
Shot
A character's "shot" is the player's primary method of attacking enemies. While the shot's attack area and behavior varies depending on the character type the player has chosen, the shot can be powered up by filling up the Power Level by collecting power items. The shot gradually becomes more powerful when the player reaches the Power Levels of 8, 24, 48, 80, and 128 (MAX), respectively. When the player reaches MAX power, all bullets on the screen cancel out and become star items which are automatically collected. While the player has maximum shot power, the player may auto-collect all items on screen by moving their character close to the top of the screen (see point of collection). This ability is very important for achieving high scores. A player who does not have maximum shot power may auto-collect above the point of collection by focusing (typically by shifting to phantom form).
Bomb
A character's "bomb" is the player's limited-use method of getting out of difficult situations. A bomb's attack area, duration, and power varies depending on the character type the player has chosen and if the player is in human form or phantom form, but it typically deals heavy damage to every enemy it touches, in addition to canceling out any bullets in the bomb's way, as well as automatically collecting every item on screen. The player's character becomes invincible during and for a short time after the bomb's effect wears off. At the beginning of the game and any time your character respawns, you will start off with 3 bombs. Bomb items will increase your current stock by one. You can carry up to a maximum of 8 bombs at a time. If you receive a bomb when you already have the maximum, that bomb will be lost.
If you got hit, you can use Last Spell to avoid losing a life. You must bomb within 0.1-0.9 seconds of getting hit (depends on which team you chose, the number of bombs you have left, and if you're facing a boss's spellcard or not). This short time interval is called "the border between life and death". A last spell uses two normal bombs (or one if you only have one), but is more powerful and lasts longer. Unfortunately, you still lose a lot of time orbs (as if you had gotten hit) if you use last spell.
Also, although it's not as widely known, the normal counter-bomb (or "deathbomb") from previous entries is present in this title as well. After your character is hit by an enemy shot, there is an extremely short window where bombing will activate a normal spellcard, not a Last Spell, and the game will continue as if you had not been hit at all.
Lives
With default settings, you will start off with 3 lives. You can lose a life by getting "hit" by an enemy attack.
The hit box for your character is quite small in comparison to your on-screen sprite, approximately only 5 pixels by 5 pixels in size. If you hold Shift, a colored dot will appear, showing the hitbox precisely. If the hit box of your character's sprite comes into contact with the hit box of an enemy bullet, laser, or the enemy itself, then you have been hit.
The player is awarded extra lives upon reaching certain point item totals. For the regular game, extra lives are awarded at 100, 250, 500, 800 and 1100 point items. You can get 1ups after defeating the midboss in stage 3 and 5. For the Extra Stage, extra lives are awarded at 200 and 666 point items. In extra, you can get a 1up after defeating the midboss and after defeating the last enemy in the regular stage. You can carry up to a maximum of 8 extra lives at a time. If you receive an extra life when you already have the maximum, you will receive a bomb instead.
When you lose a life, you also lose 16 Power points (13 are scattered for you to collect). Also, all the bullets on the screen are cleared, and you become invulnerable for a short period of time. Upon losing all your lives, you are given the option to continue right where you left off. However, if you do continue, your current score will be reset back to 11 x the number of times you have continued, your current score will not be saved, and you will not be able to save a replay of your game. You may continue until 4:30am (because continuing would advance you to 5:00am). The only exception to this rule is Final B. You can't continue in Final B.
Phantom Gauge
An important aside: In Imperishable Night, there are different species including human, youkai, magician, and vampire. All species except human are categorized under the umbrella term phantom. All phantoms have a familiar (slave) which gives them additional firepower (bosses often have many slaves who cover the screen with bullets).
The phantom gauge ranges from -100% (human) to 100% (youkai). If you kill enemies as a human (unfocused), your phantom gauge will move towards -100%. If you kill enemies as a phantom (focused), your phantom gauge will move towards 100%. As you become more human, your shots become blue. As you become more youkai, your shots typically become more red.
Some teams have limited phantom gauges:
- Teams
- Ghost team (Youmu/Yuyuko): -50 to 100%
- other teams: -100 to 100%
- Solo
- All Phantoms: -20 to 100%
- Youmu (half-human, half-ghost): -50% to 50%
- other Humans: -100 to 20%
Destroying enemy slaves will push your gauge toward 0%. Slaves may only be hit while the player is in human form. The automatic destruction of a slave due to its master being defeated does not cause this effect (it instead causes the slave to become some time orbs).
Collecting purple time orbs will push your gauge toward 100% of whatever form you are in. Two possible sources of these are spell card bonuses and enemy slaves (when they are detonated due to their master being defeated).
When you reach 80% you can collect time orbs by hitting enemies (as a human) or by grazing against bosses and killing enemies (as a phantom). Since it's important to collect as many time orbs as possible (to slow time and get high scores), you must try to keep your gauge either below -80% or above 80%. If your gauge can't ever reach 80%, you collect time orbs when you reach 30%.
If you bomb, you will push the gauge to 100%(focused) or -100%(unfocused). Counter-bombing will push your gauge the opposite direction. If you die, you will push the gauge to 0%. If you do nothing, your gauge will slowly move to 0% (this effect may be avoided by constantly switching between human and phantom forms).
| Team/character | Phantom Gauge | Hitting enemies for orbs | Grazing for orbs |
|---|---|---|---|
| Ghost Team | -50% to 100% | -50% to -30% | 80% to 100% |
| Other teams | -100% to 100% | -100% to -80% | 80% to 100% |
| All Phantoms | -20% to 100% | None | 80% to 100% |
| Youmu | -50% to 50% | -50% to -30% | 30% to 50% |
| Other humans | -100% to 20% | -100% to -80% | None |
Stages
There are 6 stages in the main game:
- Stage 1:「蛍火の行方」 Destination of the Fireflies
- Stage 2:「人間の消える道」 The Path Where Humans Vanish
- Stage 3:「歴史喰いの懐郷」 The History-Eater's Nostalgia
- Stage 4:
- Uncanny: 「伝説の夢の国」 Legendary Paradise
- Powerful: 「魔力を含む土の下」 Underneath the Mana-Saturated Soil
- Stage 5: 「穢き世の美しき檻」 A Pure Cage of the Filthy World
- Stage Final
- A: 「姫を隠す夜空の珠」 Princess-Concealing Orb in the Night Sky
- B: 「五つの難題」 Five Impossible Requests
There are two branches in the stage listing. In stage 4, you go to Uncanny if you're Marisa/Alice or Sakuya/Remilia and you go to Powerful if you're Reimu/Yukari or Youmu/Yuyuko. In practice mode, you can choose either uncanny or powerful as long as someone has already unlocked that stage.
If it's your first time with a character at the Final Stage, you automatically go to A. If you've completed the game with FinalA, you go to FinalB. If you've beaten it on A and B, you get to choose (FinalB is harder than FinalA). However, you cannot choose FinalB if you continued during the game.
Once the game has been completed (both FinalA and FinalB), an Extra Stage is unlocked. The Extra Stage features significantly stronger and faster enemies, an extremely difficult midboss and boss battle, and no option to continue if all lives are lost.
Boss Battles
The main challenge and the main attraction. Each boss has multiple lives, which are represented by multiple health bars shown at the upper left of the screen. Bosses usually alternate between attacking normally and attacking with Spell Cards, switching once with each health bar. The attack are slightly different based if the player is focus or unfocus. Colored sections on the health bar indicate the start of a Spell Card attack when the boss' health is depleted that far.
Normal attacks are incrementally stronger versions of the boss character's basic attack. Spell Card attacks bedazzle the player with combinations of complex patterns that often involve the use of projectiles and obstacles crafted especially for use with that Spell Card. If the player manages to defeat a Spell Card attack without getting hit or using any bombs, a substantial score bonus is rewarded for the feat.
Each attack is accompanied by a timer. When time runs out, the boss will switch to their next attack pattern even if their health bar isn't empty. Waiting for a boss character's attack pattern to self-destruct may be enough to beat them, but mere survival won't earn the player any score bonuses. (Note: There are some spell cards in which the boss is invulnerable. For those cards, you WILL get a score bonus if you survive the countdown to zero.)
When fighting a boss, a position marker shows up on the bottom margin of the screen, indicating where the boss is on the horizontal axis. Since your target can be completely obscured by bullets or darkness at times, use this marker to help you aim your shots. The marker will dim when the boss is being hit, and will flash red when her health bar gets sufficiently depleted.
If you meet the time orb requirement for the stage and are not playing at Easy difficulty, the boss will finish off with at least one last spell (the equivalent of the boss using a counter-bomb before she dies). These spells are significantly harder than the main spell cards but are a way to earn bonus points. You cannot use bombs or lose life in a last spell (it simply fails if you get hit). During a last spell, your number of extra lives and bombs is crossed out with a red and white "x" and the word nullify.
Screen Layout
(from shrinemaiden)
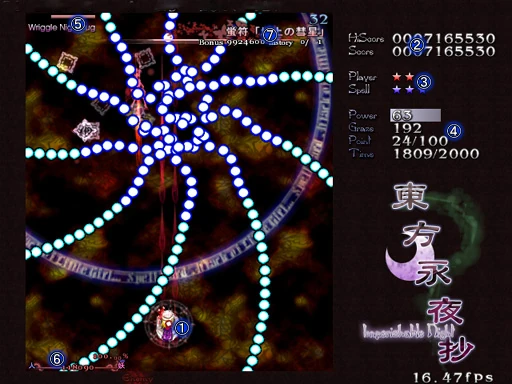
- Your character
- Player Score
- High Score: your highest score for the current character, type, and difficulty
- Score: your current score
- The number of remaining lives and bombs / The approximate location of the point of collection
- Player Status
- Power: your shot power level, maxing out at 128
- Graze: the number of enemy shots that have grazed your hitbox during the game
- Point: the number of point items you have collected during the game and the amount needed for an extra life
- Time: the number of time orbs you have collected during this stage and the amount needed to slow time by 0:30 for this stage
- Enemy Status
- Left bar(s): the number of health bars the enemy has left. White bars indicate the boss will use regular attacks, red bars indicate the boss will use a spell card.
- Right number: the amount of time left before the enemy's attack spell fails (self-destructs)
- Phantom Gauge
- The percent human or youkai
- Blue means human(人)
- Red means youkai(妖)
- Spell Card Status
- Title: the name of the Spell Card being used
- Bonus: the constantly-updating value of the Spell Card Bonus
- History: the number of times you have "collected" the Spell Card currently being used, and the number of times you have faced it.
Unlockable Features
- Level Practice: This feature allows a character/team to practice a level that she/they have already beaten. You begin with 9 lives and 3 bombs. If you lose all your lives, you can't continue.
- Spell Practice: This feature allows a character/team to practice a spell they have already seen. By beating enough spells in Spell Practice, you can unlock Last Word Spell cards. Spell Practice is unlocked by beating the game with the normal ending (i.e. before the game time reaches 5:00 am). (To select a team in spell practice, press left or right and the team shown in the background will change.) Note: In Spell Practice, all cards are played as Last Spells (i.e. sudden death, no bombs).
- Play as Individual Character: This feature allows you to play as an individual rather than as a team. To unlock this, all teams must have beaten both FinalA and FinalB.
- Last Word Spell Cards: These are spell cards that are typically earned by accomplishing certain feats such as beating the game using certain characters/difficulties or seeing/mastering a sufficient number of spell cards. See Last Word Spell Cards for details.
Playable Characters
幻想の結界チーム (Illusionary Border Team)
- ■ Human Side:
- 博麗 霊夢 (Reimu Hakurei)
- Normal Speed: ★★★★
- Focused Speed: ★
- Special Skill: Doesn't get hurt when colliding with an enemy familiar.
- Shot: 「マインドアミュレット」 ("Mind Amulet") [spread + homing, medium strength]
- Spell Card: 霊符「夢想妙珠」 (Spirit Sign "Fantasy Orb")
- Last Spell: 神霊「夢想封印 瞬」 (Divine Spirit "Fantasy Seal -Blink-")
- ● Phantom Side:
- 八雲 紫 (Yukari Yakumo)
- Normal Speed: ★★★★
- Focused Speed: ★
- Familiar: 「召喚八雲式」 ("Summoning Shikigami, type-Yakumo") [homing, weak]
- Shot: 「妖回針」 ("Apparition Needle") [straight, medium strength]
- Spell Card: 境符「四重結界」 (Border Sign "Quadruple Barrier")
- Last Spell: 境界「永夜四重結界」 (Boundary "Quadruple Barrier of the Imperishable Night")
- Team Characteristics:
- Small hitbox.
- Long reaction-time given for using Last Spells.
- Can use a Last Spell with only one bomb remaining.
禁呪の詠唱チーム (Aria of Forbidden Magic Team)
- ■ Human Side:
- 霧雨 魔理沙 (Marisa Kirisame)
- Normal Speed: ★★★★★★
- Focused Speed: ★★
- Special Skill: Item auto-collection is enabled even when shot power is not maximum.
- Shot: 「スターダストミサイル」 ("Stardust Missile") [narrow forward, strong]
- Spell Card: 恋符「マスタースパーク」 (Love Sign "Master Spark")
- Last Spell: 魔砲「ファイナルスパーク」 (Magicannon "Final Spark")
- ● Phantom Side:
- アリス・マーガトロイド (Alice Margatroid)
- Normal Speed: ★★★★
- Focused Speed: ★★
- Familiar: 「上海人形」 ("Shanghai Doll") [narrow forward, strong]
- Shot: 「スペクトルミステリー」 ("Spectrum Mystery") [narrow forward, strong]
- Spell Card: 魔符「アーティフルサクリファイス」 (Magic Sign "Artful Sacrifice")
- Last Spell: 魔操「リターンイナニメトネス」 (Magipulation "Return Inanimateness")
- Team Characteristics:
- Large hitbox for items.
- Large item auto-collection area.
夢幻の紅魔チーム (Visionary Scarlet Devil Team)
- ■ Human Side:
- 十六夜 咲夜 (Sakuya Izayoi)
- Normal Speed: ★★★★
- Focused Speed: ★★★
- Special Skill: The item falling speed becomes slower.
- Shot: 「ミステリアスジャック」 ("Mysterious Jack") [spread, weak]
- Spell Card: 幻符「殺人ドール」 (Illusion Sign "Killer Doll")
- Last Spell: 幻葬「夜霧の幻影殺人鬼」 (Buriallusion "Phantomic Killer in Night Mist")
- ● Phantom Side:
- レミリア・スカーレット (Remilia Scarlet)
- Normal Speed: ★★★★★★
- Focused Speed: ★★★
- Familiar: 「サーヴァントフライヤー」 ("Servant Flier") [stationary forward, strong]
- Shot: 「ナイトダンス」 ("Night Dance") [forward, weak]
- Spell Card: 紅符「不夜城レッド」 (Scarlet Sign "Red the Nightless Castle")
- Last Spell: 紅魔「スカーレットデビル」 (Scarlet Magic "Scarlet Devil")
- Team Characteristics:
- Large hitbox for grazing.
- A bomb item is released when hit, if the previous life had unused bombs.
幽冥の住人チーム (Netherworld Dwellers' Team)
- ▲ Half-Human Side:
- 魂魄 妖夢 (Youmu Konpaku)
- Normal Speed: ★★★★★★
- Focused Speed: ★
- Special Skill: Youmu's ghost half fires in the opposite direction of the player's last button press (i.e. if the player moves left, it will fire to Youmu's right).
- Familiar: 「半幽霊」 ("Ghostly Half") [multi-directional, strong]
- Shot: 「六道怪奇」 ("Bizarreness of Six Realms") [forward, strong]
- Spell Card: 人符「現世斬」 (Human Sign "Slash of Present")
- Last Spell: 人鬼「未来永劫斬」 (Obsessor "Slash of the Eternity")
- ● Phantom Side:
- 西行寺 幽々子 (Yuyuko Saigyouji)
- Normal Speed: ★★★★
- Focused Speed: ★
- Familiar: 「死蝶霊」 ("Deadly Butterfly") [spread, weak]
- Shot: 「対岸の誘い」 ("Invitation from Nether Side") [spread, weak]
- Spell Card: 死符「ギャストリドリーム」 (Death Sign "Ghastly Dream")
- Last Spell: 死蝶「華胥の永眠」 (Deadly Butterfly "Everlasting Nap")
- Team Characteristics:
- The human side of the ratio meter is half-size.
- An extra bomb is rewarded for each completed stage (if the current number of bombs is less than 3).
Scoring
Enemies
Any damage you deal to any enemy, whether it be caused by your shots or your bombs, will cause your score to increase very slightly. Actually destroying enemies will award you slightly more points, but the points earned from this are around the range of hundreds to thousands of points per enemy. This is not a significant amount at all. However, enemies shoot bullets for you to "graze" and release items for you to collect, and those are very important for scoring as covered below.
Grazing
"Grazing a bullet" means to have a bullet or laser come dangerously close to your hitbox. Depending on your phantom gauge, the points for grazing and the number added to the graze counter per bullet differ:
| Phantom gauge | Score value | Counter value | ||
|---|---|---|---|---|
| Youmu Solo | Ghost Team | Other Characters | ||
| -50% to -30% | -50% to -30% | -100% to -80% | 6,000 | 3 |
| -30% to -20% | -30% to -20% | -80% to -20% | 4,000 | 2 |
| -20% to 20% | -20% to 20% | -20% to 20% | 2,000 | 1 |
| 20% to 30% | 20% to 80% | 20% to 80% | 4,000 | 1 |
| 30% to 50% | 80% to 100% | 80% to 100% | 6,000 | 1 |
You can only graze a bullet once, so you won't gain any additional points or graze by following a bullet. Lasers can be continually grazed throughout their duration, but once again, moving around will not gain you any additional points or graze.
Point Items
As the name implies, point items are the major source of points in the game. The higher up on the screen you collect them, the more points they are worth, up to a defined maximum. You can easily tell when you are collecting point items for their maximum value, since they show the value in yellow text. The auto-item-collect line is the same height as the height where point items reach their maximum value, so take advantage of this fact wherever you can for massive points.
A regular point item is worth the amount listed under the phantom gauge, This amount is doubled when the player is below -80% (or -30%, with Youmu).
Mini-point items (little blue circles) are worth 1/10 of a regular point item.
The point value increase by 10 for every 2 time orbs that are collected.
The starting values are:
| Easy | 60,000 |
| Normal | 100,000 |
| Hard | 200,000 |
| Lunatic | 300,000 |
| Extra | 300,000 |
Power Items
Power items increase the power of your shot. While your shot is not fully powered up, power items are worth only 10 points. Once fully powered up, all power items currently on the screen become (Mini-)Point items. While the character is at max power, power items no longer appear, and Point items appear instead.
Large power items are worth 8 normal power items. There is also a full power item (it's yellow), which appears if you continue. It brings you to full power and is worth 300 points. It is worth 1000 points if you are already at full power.
Time Orbs
Exclusive to Imperishable Night, they are believed to slow the passing of the night. Time orbs are essential to scoring in the game. The value of a time orb depends on the number of total point items you have collected. They are worth [# of large point items / 2] X 10, and the minimum value of a time orb is 100 points.
Time orbs appear in one of five ways:
- Collecting a spell card bonus
- Firing at enemies while in -80% human mode
- Grazing while in +80% phantom mode
- Causing enemy slaves to be detonated by destroying their master
- Destroying enemies while in -80% human mode or +80% phantom mode
The effects of collecting them are:
- If a certain number is collected in a stage, the game clock only advances 30 minutes, as opposed to an hour. Also you get to try the corresponding stage boss's last spell.
- For every two orbs collected, the point counter increases by 10 points.
- Each time orb that is collected in human mode bumps the phantom gauge toward the human side. The reverse happens when a time orb is collected in phantom mode.
- Collecting a time orb during a spell card will increase the spell card bonus by 8000 points.
Star Items
These items appear any time an enemy bullet is canceled out. This can happen when you defeat an attack pattern of a boss (by depleting their current health bar), at the moment you gain maximum shot power, when you destroy a certain enemy, or when you erase enemy bullets with a bomb. The point values of star items is based on the number of grazes you have. The formula is as follows: int(graze/40)*10+300. For example: if you have 10 grazes, each star item will be worth 300 points [0+300], and if you have 4039, each star item is worth 1300 points [1000+300].
Enemy Bullet Bonus
When you finish off one of the boss's lives (caused by completely depleting the visible healthbar) or defeat a Spell Card of a boss, all enemy bullets on screen are tallied up to calculate the Enemy Bullet Bonus. The more enemy bullets there are on screen, the higher this bonus becomes. This bonus is independent of any star items collected from finishing off a boss's attack pattern. Finding the correct time in a boss's attack to finish them off can mean the difference between an Enemy Bullet bonus of 100,000 and one of 4,000,000 or more.
The formula that the game uses to calculate the bullet bonus is as such: The first bullet that is on the screen is worth 2000 points. For each bullet after this, its value increases by 20, up to the max of 8000 points per bullet. For example, the first bullet is worth 2000, second is 2020, third: 2040, fourth: 2060, and so on till the 301st and beyond bullets are worth 8000 points each.
Spell Card Bonus
Occasionally, a boss will attack using a Spell Card. You will know this is happening when the background changes and the Spell Card's name appears in the upper right corner of the screen. If the boss's health bar is depleted within the time limit and without getting hit or using a bomb, the Spell Card bonus will be added to your score. The starting value of the bonus depends on the Spell Card used. As the time remaining decreases, the bonus decreases in value as well. For each time orb collected during the Spell Card (either from grazing as a phantom, or shooting as a human), 8000 points are added to the Spell Card bonus. However, the bonus cannot increase past its initial value, except for survival Spell Cards, for which the maximum Spell Card bonus value is 99,999,990.
Clear Bonus
At the end of each stage, the player is awarded a point bonus based on their performance throughout the stage. The bonus is calculated as follows:
Stage       10,000,000 (Stage 1)
            15,000,000 (Stage 2)
            20,000,000 (Stage 3)
            25,000,000 (Stage 4, Uncanny or Powerful)
            30,000,000 (Stage 5)
            35,000,000 (FinalA)
            40,000,000 (FinalB)
            66,600,000 (Extra)
Point     x     50,000 (point items collected in the stage)
Graze     x        500 (graze count for that stage)
Time Orbs x      1,000 (time orbs collected in the stage)
In addition, if the stage happened to be the last stage, the following is added:
Player      x 25,000,000 (lives in stock, not including your current one)
Bomb        x  5,000,000 (bombs in stock)
Night Bonus x 20,000,000 (every 1/2 hour left before 5:00 am)
Finally, depending on the conditions you played under, the result is multiplied by these modifiers, rounded down to the nearest 10:
4 Initial Lives:    x 0.5
5 Initial Lives:    x 0.2
6 Initial Lives:    x 0.1
7 Initial Lives:    x 0.05
Easy Difficulty:    x 0.5
Normal Difficulty:  x 1.0
Hard Difficulty:    x 1.2
Lunatic Difficulty: x 1.5
Extra Difficulty:   x 2.0
The end result is then added on to your score.
The Time System
Time requirements by level:
| Difficulty | Stage 1 | Stage 2 | Stage 3 | Stage 4-powerful | Stage 4-uncanny | Stage 5 |
|---|---|---|---|---|---|---|
| Easy | 2000 | 6500 | 7500 | 7500 | 9999 | 9999 |
| Normal | 2500 | 7200 | 8500 | 8500 | 9999 | 9999 |
| Hard | 2700 | 7200 | 8800 | 8500 | 9999 | 9999 |
| Lunatic | 3000 | 7200 | 8800 | 8500 | 9999 | 9999 |
Kaguya's last spells have some special rules regarding time. During her last spells, time is added for not clearing each spell card:
- Cleared: no time added
- 00-09 seconds left: +0:30 to time
- 10-19 seconds left: +1:00 to time
- 20+ seconds left: +1:30 to time
Also, even if 5:00am is reached during Kaguya's last spells, the player is still considered to have beaten the game; however, the player does not receive a Night Bonus and cannot challenge any remaining last spells.
| ||||||||||||||||||||||||||||||||||||||
- Return to Imperishable Night